Kotlin 语言 BindingAdapter 与 LiveData双向绑定
环境编译配置
AndroidStudio 2021.1.1
Gradle:gradle-7.1.2-bin.zip
创建一个项目
项目的build.gradle配置:
1
2
3
4
5
| dependencies {
classpath 'com.android.tools.build:gradle:7.1.2'
classpath "org.jetbrains.kotlin:kotlin-gradle-plugin:1.6.10"
}
|
App module build.gradle配置
1
2
3
4
5
6
7
8
9
10
11
12
13
14
15
16
17
| plugins {
id 'com.android.application'
id 'kotlin-android'
id 'kotlin-kapt'
}
android {
dataBinding {
enabled true
}
}
dependencies {
implementation "androidx.lifecycle:lifecycle-extensions:2.2.0"
}
|
普通双向绑定
普通的组件,例如TextView、EditText,官方平台提供对双向数据绑定的内置支持
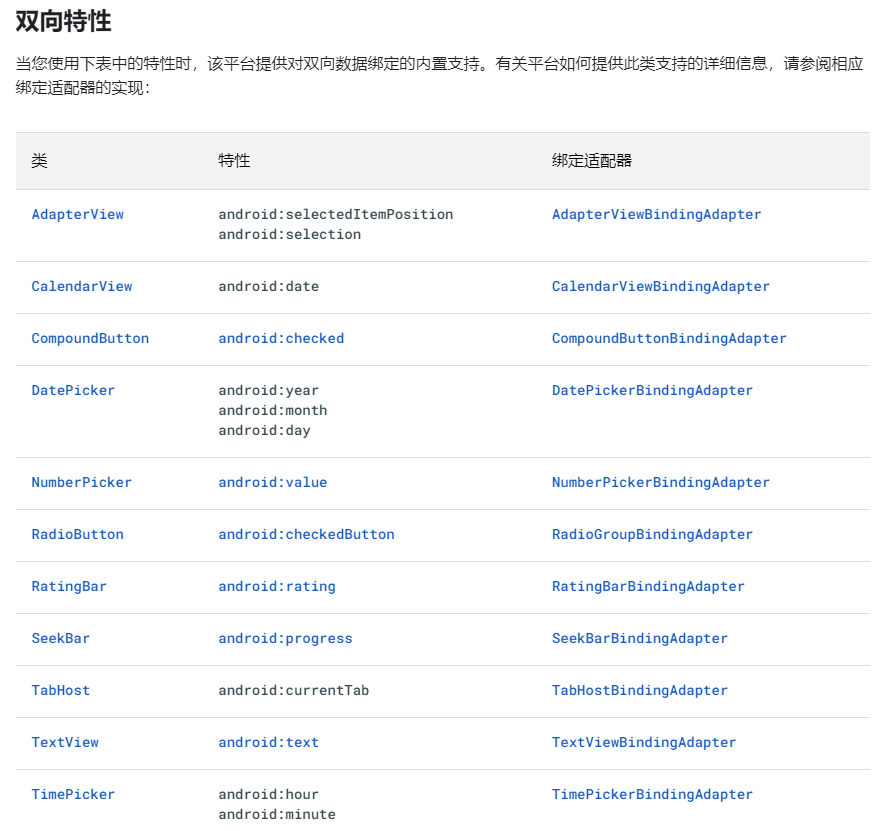
所以常用的组件,可以通过@={}符号,实现数据的双向绑定,以下取个例子:
创建 MainViewModel
1
2
3
4
5
6
7
8
9
10
11
12
13
14
|
class MainViewModel : ViewModel() {
val mUserNameMD = MutableLiveData("")
val mUserPasswdMD = MutableLiveData("")
}
|
MainActivity 代码如下:
1
2
3
4
5
6
7
8
9
10
11
12
13
14
15
16
17
18
19
20
21
22
23
24
25
26
27
28
29
30
31
32
33
34
35
36
37
38
39
40
41
42
43
44
| class MainActivity : AppCompatActivity() {
private val mState: MainViewModel by lazy {
ViewModelProvider(this).get(MainViewModel::class.java)
}
override fun onCreate(savedInstanceState: Bundle?) {
super.onCreate(savedInstanceState)
val binding: ActivityMainBinding = DataBindingUtil.setContentView(
this, R.layout.activity_main
)
binding.vm = mState
binding.click = OnCLickProxy()
binding.lifecycleOwner = this
observe()
}
private fun observe() {
mState.mUserNameMD.observe(this) {
Log.i(MainActivity::class.java.simpleName, "UserName: $it")
}
mState.mUserPasswdMD.observe(this) {
Log.i(MainActivity::class.java.simpleName, "UserPasswd: $it")
}
}
inner class OnCLickProxy {
fun onSubmit() {
Log.i(MainActivity::class.java.simpleName, "取值, UserName: ${mState.mUserNameMD.value}, UserPasswd: ${mState.mUserPasswdMD.value}")
mState.mUserNameMD.postValue("张三")
mState.mUserPasswdMD.postValue("123")
}
}
}
|
activity_main代码如下
1
2
3
4
5
6
7
8
9
10
11
12
13
14
15
16
17
18
19
20
21
22
23
24
25
26
27
28
29
30
31
32
33
34
35
36
37
38
39
40
41
42
43
44
45
46
47
48
49
50
51
52
53
54
55
56
57
58
59
60
61
62
63
64
65
66
67
68
69
70
71
72
73
74
75
76
77
78
79
80
| <?xml version="1.0" encoding="utf-8"?>
<layout xmlns:android="http://schemas.android.com/apk/res/android"
xmlns:app="http://schemas.android.com/apk/res-auto"
xmlns:tools="http://schemas.android.com/tools">
<data>
<variable
name="vm"
type="com.example.databinding.MainViewModel" />
<variable
name="click"
type="com.example.databinding.MainActivity.OnCLickProxy" />
</data>
<androidx.constraintlayout.widget.ConstraintLayout
android:layout_width="match_parent"
android:layout_height="match_parent"
android:layout_margin="40dip"
tools:context=".MainActivity">
<TextView
android:id="@+id/tvDesc"
android:layout_width="wrap_content"
android:layout_height="wrap_content"
android:text="数据双向绑定"
android:textSize="18sp"
android:textStyle="bold"
app:layout_constraintLeft_toLeftOf="parent"
app:layout_constraintTop_toTopOf="parent" />
<TextView
android:id="@+id/tvUserName"
android:layout_width="wrap_content"
android:layout_height="wrap_content"
android:layout_marginTop="20dp"
android:text="用户名:"
app:layout_constraintLeft_toLeftOf="parent"
app:layout_constraintTop_toBottomOf="@+id/tvDesc" />
<EditText
android:id="@+id/etUserName"
android:layout_width="match_parent"
android:layout_height="wrap_content"
android:text="@={vm.mUserNameMD}"
app:layout_constraintLeft_toLeftOf="parent"
app:layout_constraintTop_toBottomOf="@+id/tvUserName" />
<TextView
android:id="@+id/tvUserPasswd"
android:layout_width="wrap_content"
android:layout_height="wrap_content"
android:layout_marginTop="20dp"
android:text="密码:"
app:layout_constraintLeft_toLeftOf="parent"
app:layout_constraintTop_toBottomOf="@+id/etUserName" />
<EditText
android:id="@+id/etUserPasswd"
android:layout_width="match_parent"
android:layout_height="wrap_content"
android:text="@={vm.mUserPasswdMD}"
app:layout_constraintLeft_toLeftOf="parent"
app:layout_constraintTop_toBottomOf="@+id/tvUserPasswd" />
<Button
android:id="@+id/btnSubmit"
android:layout_width="match_parent"
android:layout_height="wrap_content"
android:layout_marginTop="20dp"
android:onClick="@{()->click.onSubmit()}"
android:text="提交"
app:layout_constraintLeft_toLeftOf="parent"
app:layout_constraintTop_toBottomOf="@+id/etUserPasswd" />
</androidx.constraintlayout.widget.ConstraintLayout>
</layout>
|
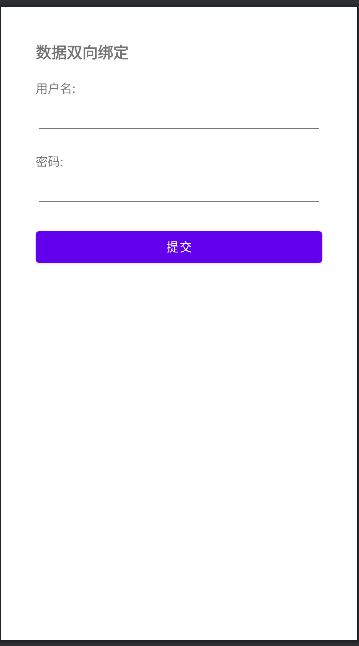
效果:
在输入框里输入任意值,点击提交按钮,能够取到输入框里的数据,同时可以改变输入框的值
自定义View双向绑定
我们创建一个自定义组件MyLoginView
1
2
3
4
5
6
7
8
9
10
11
12
13
14
15
16
17
18
19
20
21
22
| class MyLoginView : LinearLayout {
lateinit var mEtUserName: EditText
lateinit var mEtUserPasswd: EditText
constructor(context: Context) : super(context) {}
constructor(context: Context, attrs: AttributeSet?) : super(context, attrs) {
init(context)
}
constructor(context: Context, attrs: AttributeSet?, defStyleAttr: Int) : super(context, attrs, defStyleAttr) {}
private fun init(context: Context) {
val view: View = LayoutInflater.from(context).inflate(R.layout.layout_login, this)
mEtUserName = view.findViewById(R.id.etUserName)
mEtUserPasswd = view.findViewById(R.id.etUserPasswd)
}
}
|
layout_login.xml :
1
2
3
4
5
6
7
8
9
10
11
12
13
14
15
16
17
18
19
20
21
22
23
24
25
26
27
28
29
30
31
32
33
34
35
36
37
38
39
40
41
42
43
44
45
46
47
48
49
50
51
52
53
54
55
| <?xml version="1.0" encoding="utf-8"?>
<layout xmlns:android="http://schemas.android.com/apk/res/android"
xmlns:app="http://schemas.android.com/apk/res-auto"
xmlns:tools="http://schemas.android.com/tools">
<androidx.constraintlayout.widget.ConstraintLayout
android:layout_width="match_parent"
android:layout_height="match_parent"
android:padding="10dp"
tools:context=".MainActivity">
<TextView
android:id="@+id/tvDesc"
android:layout_width="wrap_content"
android:layout_height="wrap_content"
android:text="数据双向绑定(自定义组件)"
android:textSize="18sp"
android:textStyle="bold"
app:layout_constraintLeft_toLeftOf="parent"
app:layout_constraintTop_toTopOf="parent" />
<TextView
android:id="@+id/tvUserName"
android:layout_width="wrap_content"
android:layout_height="wrap_content"
android:layout_marginTop="20dp"
android:text="用户名:"
app:layout_constraintLeft_toLeftOf="parent"
app:layout_constraintTop_toBottomOf="@+id/tvDesc" />
<EditText
android:id="@+id/etUserName"
android:layout_width="match_parent"
android:layout_height="wrap_content"
app:layout_constraintLeft_toLeftOf="parent"
app:layout_constraintTop_toBottomOf="@+id/tvUserName" />
<TextView
android:id="@+id/tvUserPasswd"
android:layout_width="wrap_content"
android:layout_height="wrap_content"
android:layout_marginTop="20dp"
android:text="密码:"
app:layout_constraintLeft_toLeftOf="parent"
app:layout_constraintTop_toBottomOf="@+id/etUserName" />
<EditText
android:id="@+id/etUserPasswd"
android:layout_width="match_parent"
android:layout_height="wrap_content"
app:layout_constraintLeft_toLeftOf="parent"
app:layout_constraintTop_toBottomOf="@+id/tvUserPasswd" />
</androidx.constraintlayout.widget.ConstraintLayout>
</layout>
|
自定义DatabindingAdapter(注意是kotlin文件,不是类。定义成object类也可以):
1
2
3
4
5
6
7
8
9
10
11
12
13
14
15
16
17
18
19
20
21
22
23
24
25
26
27
28
29
30
31
32
33
34
35
36
37
38
39
40
41
42
43
44
45
46
47
48
49
|
@BindingAdapter(value = ["userName", "userPasswd"], requireAll = false)
fun setUserInfo(view: MyLoginView?, userName: String?, userPasswd: String?) {
view?.mEtUserName?.setText(userName ?: "")
view?.mEtUserPasswd?.setText(userPasswd ?: "")
}
@InverseBindingAdapter(attribute = "userName")
fun getUserName(view: MyLoginView?): String {
return view?.mEtUserName?.text.toString()
}
@BindingAdapter("userNameAttrChanged")
fun setUserNameListener(view: MyLoginView, listener: InverseBindingListener?) {
view.mEtUserName?.onFocusChangeListener = View.OnFocusChangeListener { focusedView, hasFocus ->
if (!hasFocus) {
listener?.onChange()
}
}
}
@InverseBindingAdapter(attribute = "userPasswd")
fun getUserPasswd(view: MyLoginView?): String {
return view?.mEtUserPasswd?.text.toString()
}
@BindingAdapter("userPasswdAttrChanged")
fun setUserPasswdListener(view: MyLoginView, listener: InverseBindingListener?) {
view.mEtUserPasswd?.onFocusChangeListener = View.OnFocusChangeListener { focusedView, hasFocus ->
if (!hasFocus) {
listener?.onChange()
}
}
}
|
MainActivity2:
1
2
3
4
5
6
7
8
9
10
11
12
13
14
15
16
17
18
19
20
21
22
23
24
25
26
27
28
29
30
31
32
33
34
35
36
37
38
39
40
41
42
43
44
45
46
47
48
49
50
51
| class MainActivity2 : AppCompatActivity() {
private val mState: MainView2Model by lazy {
ViewModelProvider(this).get(MainView2Model::class.java)
}
override fun onCreate(savedInstanceState: Bundle?) {
super.onCreate(savedInstanceState)
val binding: ActivityMain2Binding = DataBindingUtil.setContentView(
this, R.layout.activity_main2
)
binding.vm = mState
binding.click = OnCLickProxy()
binding.lifecycleOwner = this
observe()
}
private fun observe() {
mState.mUserNameMD.observe(this) {
Log.i(MainActivity2::class.java.simpleName, "UserName: $it")
}
mState.mUserPasswdMD.observe(this) {
Log.i(MainActivity2::class.java.simpleName, "UserPasswd: $it")
}
}
inner class OnCLickProxy {
fun onSubmit(view: View) {
view.isFocusableInTouchMode = true
view.isFocusable = true
view.requestFocus()
Log.i(MainActivity2::class.java.simpleName, "取值, UserName: ${mState.mUserNameMD.value},")
Log.i(MainActivity2::class.java.simpleName, "取值, UserPasswd: ${mState.mUserPasswdMD.value},")
mState.mUserNameMD.postValue("张三")
mState.mUserPasswdMD.postValue("123")
}
}
}
|
activity_main2.xml:
1
2
3
4
5
6
7
8
9
10
11
12
13
14
15
16
17
18
19
20
21
22
23
24
25
26
27
28
29
30
31
32
33
34
35
36
37
38
39
40
41
42
43
44
45
46
| <?xml version="1.0" encoding="utf-8"?>
<layout xmlns:android="http://schemas.android.com/apk/res/android"
xmlns:app="http://schemas.android.com/apk/res-auto"
xmlns:tools="http://schemas.android.com/tools">
<data>
<variable
name="vm"
type="com.example.databinding.customview.MainView2Model" />
<variable
name="click"
type="com.example.databinding.customview.MainActivity2.OnCLickProxy" />
</data>
<androidx.constraintlayout.widget.ConstraintLayout
android:layout_width="match_parent"
android:layout_height="match_parent"
android:layout_margin="40dip"
tools:context=".MainActivity">
<com.example.databinding.customview.MyLoginView
android:id="@+id/loginView"
android:layout_width="match_parent"
android:layout_height="wrap_content"
app:layout_constraintEnd_toEndOf="parent"
app:layout_constraintStart_toStartOf="parent"
app:layout_constraintTop_toTopOf="parent"
app:userName="@={vm.mUserNameMD}"
app:userPasswd="@={vm.mUserPasswdMD}" />
<Button
android:id="@+id/btnSubmit"
android:layout_width="match_parent"
android:layout_height="wrap_content"
android:layout_marginTop="20dp"
android:onClick="@{(view)->click.onSubmit(view)}"
android:text="提交"
app:layout_constraintLeft_toLeftOf="parent"
app:layout_constraintTop_toBottomOf="@+id/loginView" />
</androidx.constraintlayout.widget.ConstraintLayout>
</layout>
|
MainView2Model:
1
2
3
4
5
6
7
8
| class MainView2Model : ViewModel() {
val mUserNameMD = MutableLiveData("")
val mUserPasswdMD = MutableLiveData("")
}
|
以上源码:https://github.com/myc185/TwowaySample.git
相关问题
编译时遇到 Caused by: javax.net.ssl.SSLException: SSL peer shut down incorrectly
在项目build.gradle中增加
1
2
3
4
| maven {
url = "http://maven.aliyun.com/nexus/content/groups/public/"
allowInsecureProtocol = true
}
|
然后 点击 File –> Sync Project with Gradle FIles 重新编译一次即可
全部如下:
1
2
3
4
5
6
7
8
9
10
11
12
13
14
15
16
17
18
19
20
21
22
23
24
25
26
27
28
| buildscript {
repositories {
maven {
url = "http://maven.aliyun.com/nexus/content/groups/public/"
allowInsecureProtocol = true
}
google()
mavenCentral()
}
dependencies {
classpath "com.android.tools.build:gradle:$gradleVersion"
classpath "org.jetbrains.kotlin:kotlin-gradle-plugin:$kotlinVersion"
}
}
allprojects {
repositories {
maven {
url = "http://maven.aliyun.com/nexus/content/groups/public/"
allowInsecureProtocol = true
}
google()
mavenCentral()
}
}
|
相关资料
参考文档
https://developer.android.com/topic/libraries/data-binding/two-way?hl=zh-cn
参考SampleDemo:
https://github.com/android/databinding-samples
Ursprünglicher Link: http://www.luckymo.cn/2022/03/13/BindingAdapter与LiveData双向绑定/
Copyright-Erklärung: 转载请注明出处.